 So you believe in Content Marketing, and you will be using more of it along with 93% of B2B marketers (according to CMI).
But what kinds of media work best for your content right now? And what tools do you need to create these kinds of content?
Without a doubt, visual content rules. Colorful images, infographs, memes and animated gifs are readily shared on social media and blog posts.
What are the popular media used for visuals and what free tools are available to you?
Twitter now offers larger profile and header images as well as inline photos and videos. Facebook and Google Plus allow bigger size images; even the thumbnail of your own image in the Google Hangout On Air application is now bigger. This has just been rolled out at the time I am writing this, as highlighted by Ronnie Bincer.
So why visual content?
- 90% of information transmitted to the brain is visual. Visuals are processed 60 thousand times faster in the brain than text. (Sources: 3M Corporation and Zabisco). Who can resist colorful images or cute animated cat gif?
- They produce more engagement – more likes, comments and re-shares
- 40% of people will respond better to visual information than plain text. (Source:Zabisco)
- Videos on landing pages increase average page conversion rates by 86%.
The list goes on but you get the idea. They are also in a readily shareable formats and provide more opportunities for comments, re-shares and likes.

If you are a graphic designer, this is good news for you. More people will be requiring infographs and cool images (memes and gif included).
But if you are a teacher, coach, trainer, or a business owner who are not familiar with Photoshop or illustrator, I will show you 3 free content creation tools you can use.
The tools I introduce here are intuitive to use. You can use the tools without going through loads of tutorials and come up with amazing images for your social media and blog posts. I’ve enjoyed what I can do with these tools.
Disclosure: I am not related to any of these applications and all links provided are not affiliate links. This is not going to be a long list of endless tools but I will share only those I (or my team) have used and have found to be effective.
We’ll include 3 different types of visual content for your teaching / training business:
A. Videos (both visual and audio)
B. Online Presentations (both visual and audio)
C. Images and Infographs (visual and can sometimes be animated)
A. Videos
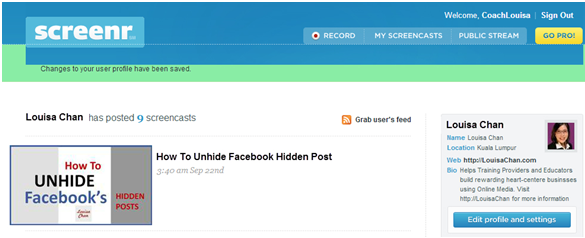
i. Screen Casting Tools are great for creating How To Videos. Try Screenr.com

You can use this application to record activities and notes on your computer screen (generally referred to as screencast). With this application you don’t need to download any software. If you want to demonstrate navigational path on the internet then screencasts are the best.
There is a simple tutorial at their site to show you the how, but you can’t go wrong as there’s only one button to click to record. That’s the “Record” button. If you know how to use your iPhone to record video, you’ll know how to use this.
Video quality is great even at full screen. I’m impressed with how sharp the visual looks. It allows you to share the video to social media sites upon publication. You can also download you videos without any watermark.
Screenr allows you to host your videos at their platform. I have made many YouTube tutorial videos with Screenr before I decided to upgrade and use paid applications. Although there are no editing capabilities, this is an application I would recommend you try if you are making your first video tutorial. You can create an account using your social media log ins or your Yahoo account.
There are paid business plans or you sign up for a 15-day free trial period without giving your credit card information.
What I like about it: It runs on Mac and PC, no installation and provides one click recording.
Limitation: Video production is limited to 5 minutes with no editing capabilities.
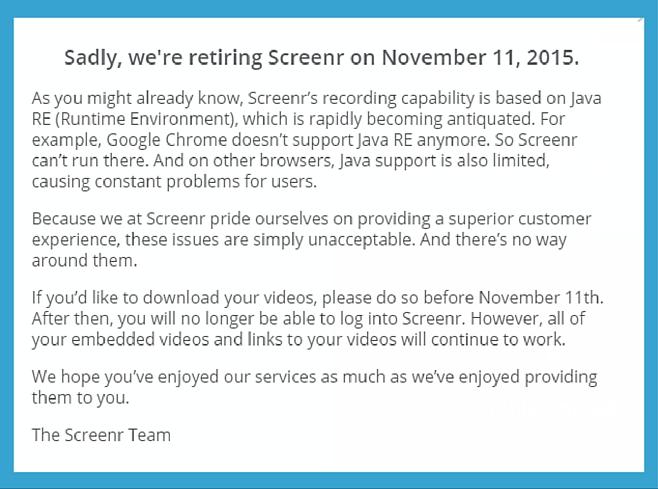
Note: As of 11th November 2015, Screenr will expire. So if you have videos that are hosted on Screenr, please do download. This is the message I get when I log on to download my videos.

B. Online Presentation Tools For Short Lessons and Tutorials – Try Present.Me
 This is especially useful for the training and speaking professionals. If you have presentation slides from previous speaking engagements, you can now re-purpose these into more engaging online presentations using Present.Me.
It is a cloud-base application that allows you to create, upload, edit and share your slide and video presentations. You upload you document (PowerPoint, or Keynote slides PDF, Prezi or Google Doc) and can create videos or audios. You record each slide as you walk through them.
It’s easy to use, and you can edit the production online (before you publish it). Present.Me allows you to edit at slide level so you can re-record just that one or two slides. You can also share the contact to major social media sites or have them embedded.
The free version allows you to produce up to 3 pieces of content a month. Paid versions are available for those who need more frequent content creation, password protection, downloads and analytics.
Trainers and speakers would enjoy using this application. It’s giving you the tool to address the world doing what you love. If you like teaching and sharing and you know how to use pwoerpoint or keynote, you can do this easily.
What I like about it: you can include a video recording you as you teaching as well as shows the slides in the final product. This allows the audience to see who the speaker and is great for credibility building.
Limitation: You can only produce 3 pieces of content per month with the free plan. Other than that, this is a great app to try.
C. Online Images Creation Tool For Social Media and Blog Posts. Try Canva.com
 This is a great application although still in beta and lacks some features I would like.
Canva has templates that have been optimized for the different social media platforms.
It even has a Kindle eBook Cover template, besides the more commonly popular Google+ header template, Twitter Card template and lots more.
If you have not tried using this application you’ll want to check it out for yourself.
There are free images that you can drag and drop into the canvas and if you need more fanciful images, Canva has paid stock photos at $1 a piece.
For someone who does not want to spend too much on a design but wants a quick diagram for a blog post or an image for Pinterest, Canva does a good job.
The color combinations and layout suggested work great and there are lots of layout suggestions for you so you don’t need to design.
The application is intuitive to use, and online tutorials are available. Sophistication is not the name of the game here.
I have been able to produce amazing visuals using this for my blogs and Google+ posts. If you have stayed away from creating visual content so far, it’s time to give it a try now.
Canva also allows for collaborative work so you can get drafts from your freelancers and make edits online without having to email it back and forth.
What I like about it: Free and easy, versatile and powerful. Just try it.
Limitation: For the sophisticated graphic designers, this may not be your cup of tea as you can’t get very precise positioning and and grid lines sometimes don’t work well.
One other limitation is that while I am able to edit and download graphics done by my team, I am not able to transfer the raw files to my account.
This feature would be required especially for those working with outsourced team members.
The diagram I made at the top of the post tells what the blog post is about and I don’t have to search for images online or risk infringing on copy right issues.
This longer image in blue here allows me to convert existing text based content on my blog post into visual content. You can do the same.
You can of course make use of infographic tools or outsource this to freelancers but there is nothing to stop you from using Canva to create visual information.
While this is not a quantitative and data driven infograph, it presents information in an easy to consume manner. Explanatory images are easier to understand and information are retained for a longer period of time.
You can also provide codes for readers to embed your image onto their site. This way more people can make use of your images and they don’t have to worry about copyrights infringements.
For example, if you’d like to embed the diagram here, all you need to do is to copy the html codes below and you can embed this on your site:
You can share this Infographic on your site
In Summary
In this post, we have considered the 3 different forms of visual content and explored 3 free tools you can use for your visual content.
For you next content creation piece try any of the free tools here and let me know which one works best for you – and why. And if you have any other tools feel free to add those in at the comment section below too.

Leave a Reply